Friday, 19 December 2014

Learning by Watching and Thinking


A clearer and more up-to-date version of this post is now contained within aaBridge.  On the  aaBridge  Welcome Screen  click on
             How to  –  Defend like an Expert

This post is about using aaBridge to follow along with previously played hands.  You can choose to follow the hand either as the declarer or as a particular defender.  When defending, observing the hand being played allows you to concentrate on counting the cards in declarer's hand while the player you are following actually does the hard work of choosing the cards.

First, go to the aaBridge website and check you have the latest version, if not please download and install it.
             http://rogerpf.com/aaBridge

An earlier set of posts, Counting the Hand  covered the basics of using your (or other peoples) played BBO hands to help you learn to count declarers distribution.

This post simplifies and gives more insight in to that procedure.  The latest version of aaBridge contains over 1,200 commented deals, sourced from the HondoBridge website. We will use one.

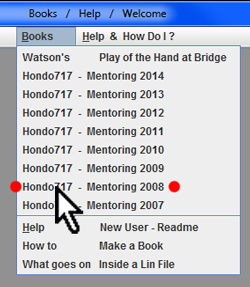
On the aaBridge menu bar click  Books  then click - Hondo717 - Mentoring 2008


The internal file  mentoring080103.lin   being the first file in that folder, will open and wish you a Happy New Year (for 2008).

Click the  Flow >  button   twice    and  Board 1  will display.  (see below)
The nine different deals in this bridge movie are shown as the bumps on the black-and-white navigation bar, bottom of the window.  Some of the deals are shown with labels like o2 and o3.  You can click anywhere on the bar and aaBridge will jump to that point in the Bridge Movie.

Looking at Board 1 you can see that the contract is 2 hearts by North, Howard (hondo717) is sitting South and is dummy (which shows slightly darker) and that the declarer sitting North is Kia (nome). We are all indebted to Howard for his bridge teaching and to Kia for producing these many hundreds of Bridge Movies.

Now you can play this Bridge Movie (.lin file) in the way intended by the author.  Just click the Flow >  button and watch the play develop and read the commentary.

But the point of this post is that with aaBridge you can do better.  Yes of course you should play through the hand as the author intended but first, I suggest you step through the deal looking only at one hand and dummy and so getting no clues from the commentary or other visible hands.
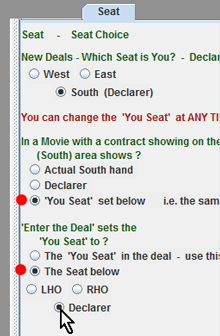
The way to do this is by using the  Enter the Deal  button but before you do that there are a couple of things to set up.


Viewing only one Seat and Dummy

Click on the Seat tab in the right-hand panel to make the Seat options visible.  If the right-hand panel is not showing drag the right-hand slider to the left.

Click on and so set the two options shown with red dots.

Now you can choose your viewing seat.  Select LHO, RHO  or Declarer.

The image above shows the Declarer radio button being clicked.
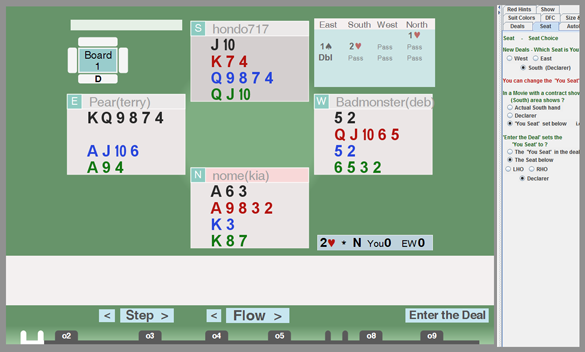
Clicking the Declarer radio button changes the display so that the declarer's hand is now shown in the bottom zone.

Click on the  Enter the Deal  button and you will enter the deal (image below) and see only the declarer 's hand, the opening lead and the dummy.  The declarer will now show in the more normal position of the South zone.

Click on the  Flow > button to watch the hand trick by trick as declarer.
A great way to improve your bridge is to go slowly through the hand, thinking all the thoughts that the declarer has to think.  How would you plan the play?  Maybe you can see a better way to play it  than the declarer did? Can you work out what the opponents have in their hands?

In this mode you have much more flexibility than when you are stepping through the main Bridge Movie.  You can change the visible hand by just clicking on any of the name bars OR show them all by clicking the show button.  You can move backwards and forwards in the play of the hand by using the navigation bar at the bottom of the window.  Just click the  Back to Movie  button to return to the main Bridge Movie.


Defense
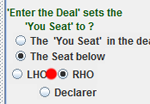
A more challenging way to go through the deal is when you are viewing it as one of the defenders. Click on the  Back to Movie  button and in the 'Enter the Deal' question select RHO as your seat of choice (red dot). Again click the  Enter the Deal  the deal button.
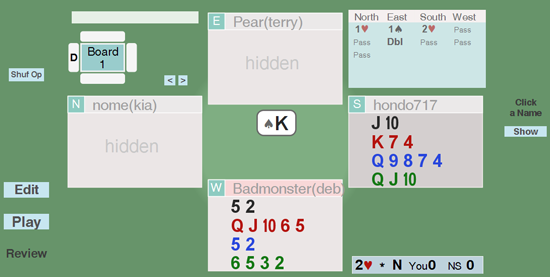
Now you are viewing this deal from the point of view of declarer's right-hand opponent.  Just like at a real table, the declarer (nome) is on your left and dummy on your right.  Your partner sitting opposite has led the king of spades.

This is an ideal way to practice the many defender skills, such as working out where declarer's high card points must be and declarer's initial suit distribution?
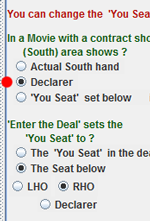
If you are someone who prefers to study defense problems with the style of diagram found in newspapers and books, where declarer is always in the South zone and the defenders are always left-right then aaBridge can do that for you too.

Go back to the main movie using the  Back to Movie button and in the Seat panel change the answer to the 'In a Movie' question to Declarer (see the red dot).

Now once again go into the deal with the  Enter the Deal  button. This time you will see that the declarer (nome) is in the South zone, while you the RHO, right-hand opponent are unsurprisingly on declarer's right.
You are of course free to choose whichever style suits you most.  However my recommendation is that you try to see if you can to get used to studying defense problems with yourself in the South zone, as that gives a far more realistic experience when compared with playing bridge for real, be it at a actual table or online.

Summary of the Procedure

Move forward in the normal Bridge Movie mode, as soon as you see a new deal immediately look down and click on the  Enter the Deal  button this avoids seeing any cards in the 'hidden' hands.

When you have viewed as much of the play as you wish to, click the  Back to Movie  button and return to moving forward in the Bridge movie.

(Very occasionally you may find that you will need to move forward in the Bridge Movie for a few clicks until you get to a point where you can  Enter the Deal.)

That's it, now all you have to do is to find the time to study.


Tidying Up  and  Other Hints

Once you have completed a session using the Hondo717 Mentoring files, you might like to set the two Seat panel questions back to their default values. The default answers are are the first radio button of each question.

Large Computer Screens
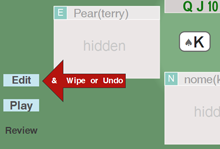
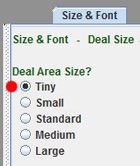
If you have a large computer screen and you want to run aaBridge at a large size so that you can more easily read the text then you may find that the bridge diagram of the hands becomes unnecessarily large.  You can counter this effect by using the Size & Font tab and by selecting Tiny (red dot).  This will produce the layout shown below.

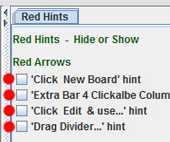
Stopping the Red Hint arrows


If you find the red arrow hints getting in your way then you can switch them off.


Select the  Red Hints tab and uncheck the four boxes.


Thursday, 3 April 2014

Reverse Bergen Major Suit Raises

This post is a teaser to get you to read/save the printable version at

This post follows from the previous one, on Bergen Hand Evaluation.  The sample table below (one of 4 tables in the document) shows the meanings of the responses to openers 1 heart. It is shown here slightly cropped, to stop it from being too small to read.
One of the interesting things that the table shows (see the shaded bids) is why Reverse Bergen, where the 3 club bit is stronger than the 3 diamond bid, has a more natural flow.

Tuesday, 1 April 2014

High Quality LAD - Bergen Hand Evaluation

Printable ver =>  High_Qualtiy_LAD_a_Bergen_Hand_Evaluation_mnemonic.

Marty Bergen's book – Slam Bidding Made Easier – introduced a deeply clever Hand Evaluation methodology. I think of this approach as being the – Milton Work Count on steroids.

There is a fantastic tutorial on   Bergen Hand Evaluation   at   http://www.bridgesights.com/hondobridge   where this   'Bridge Movie'  can be played on line. 

Alternatively  you can download the bridge movie by clicking on the bold link above.  It can then be played on your computer with the free aaBridge Movie player from  http://rogerpf.com/z_bridge_area/bridge/aaBridge.php

Note – aaBridge is my work and I am proud of it.  However I am in no way associated with the hondobridge website.  But I did indeed write aaBridge in order that I could play, on my own computer, all of the many hundreds of fantastic bridge movies that can be found there.

I see this as a supplement to the above tutorial.  The clear explanations and examples contained in it are as good as it gets when it comes to describing how to calculate Bergen's  Starting, Dummy and Declarer  points.  One thing the bridge movie does not do is offer any advice as to how to memorise the Bergen Method. 

High Quality LAD   is my attempt at an answer.   (The best thing is, for you to start the tutorial and then return here once you are asked to do your own full calculations).

The image on the left is a  mind picture. Literally the picture I bring to mind when I calculate Bergen style.  You will have read some of the Bergen Hand Evaluation tutorial so you should already be familiar with the following –
Hcp – High Card Points.

Quality – 3 of  the top 5  (in 4+ card
          suits only)  +1 each suit.

Length –  5th, 6th ... card in any
          suit   +1 each card.

Adjust3 – Adjustment for too many
         Q & J's  ±often zero.  Can go
          up or down.

Dubious doubletons – Qx, Q, Jx, J,
       KJ, ...  -1 for each. Always
       goes down (or is zero). 


Once you know there is a fit (3+ cards in short trump hand) you can add values for the fit.  Dummy (short trumps) is the simple case –  you only add for  D  S  V  hence the dashes in that table.  For a Singleton you add, 2 pts if you have only 3 trumps and 3 pts with 4 or more.  With a Void, you add the number trumps as points.   Declarer (long trumps) gets to double dip with the trump suit +1 for the sixth and any subsequent trumps. +1 for any other 4+ card side suits. Just remember the pattern 6  4  0  2  4  and that dummy is the simple case.

Bergen
Ranges
Open Min
13 - 16
Resp Min
 6 - 9
Game
26
Med
17 - 19
Inv
10-12
Slam
33 +ctr
Max
20+
Max
13+
G S
37 +ctr

Thursday, 12 December 2013

aaBridge Watson Edition - Released

The aaBridge Watson Edition, just as the name says is a combination of the free bridge playing app and Watson's - "The Play of the Hand at Bridge".

aaBridge website

This new version is also a full lin file player. This means that it will play all the Bridge Movies (lin files) that can be found on the web. 

The very best source for these is the fantastic Hondo Bridge website, which is also the source for the Watson Book lin files embedded in the program.

For those who are interested and want to write their own lin files it also contains many 'how to' tutorials. These include how to package the whole thing into a single 'self playing' file that you can email to others, all without any programming.

Friday, 25 October 2013

Watch a Closed Torunament on BBO - How to

The EBU have started running tournaments on BBO. They are not allowing any one to watch (kibitz).  But you can still see the tournament and watch the play of the cards the moment the event finishes.  Any BBO tournament can be viewed this way.
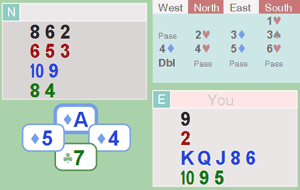
The solution is in two parts -
   1.  -  Find the 'lin' files of hands you want to watch.
   2.  -  Watch them on a good lin file viewer.

Part 2.  is covered by some the posts of the series titled Counting the Hand.
Part 1.  is below -

Finding the lin files of your tournament


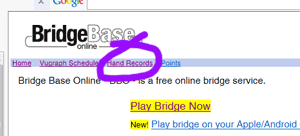
The quick way is to google  -  BBO hands  -  or one step longer, is to go to the home page of BBO and click the Hand Records item in the top bar.


then - click on

Click here for results of recent tournaments


Next you will see the list of organizations that run tournaments. As this post was inspired by the new EBU tournaments, click on the EBU link showing in the first column, ringed.


This opens the current list of recent tournaments. Currently they go back about a week.
I picked the oldest in the list. Played on - Sun Oct 20 4:00 PM. Here you have a choice.  Assuming that you want to view the better players click the Leaderboard entry, as marked above.  This open a window on the same browser page -

 The winners of the event were  Red Ace7  and  VMO60.  To watch their play click their percentage score. This opens the table of boards they played showing their scores.
Success - this is the list of lin files that we wanted to find.

See  Counting the Hand for all the details as to your choices.

If you have installed the Opera Browser and you have set it to automatically run aaBridge for lin files.  The with just one click it will download the lin file and show you the deal exactly as you want to see it.

On board 4 the winners got 65.38% playing in 4H.  In Opera I did a single click on the Lin, circled above, it downloaded the file and opened aaBridge to show -

Saturday, 19 October 2013

Cornelia's Free Bridge Class

For my face-to-face bridge I play at a small club in the UK.  Only a few of the other members play on-line. The EBU have just started running master points earning competitions on BBO. I hope this will give BBO more credibility in the eyes of those in the UK who are new to on-line bridge.

See my previous post - Acol Club on BBO - for hints on getting started.

One of the many great things about BBO is that there are a number of teachers giving classes.  This post is a shameless promotion of Cornelia Yoda's classes. Not only are they high quality but her free class (a shop window for her pay-for classes) is held at a time when us Brits are still awake and that is a BIG plus.

Cornelia's Free Bridge classes are held (almost) every week on Monday. Her class (2015) starts at 5:30 pm EDT.  10:30 pm  UK time (Except the two weeks a year when the US and UK daylight saving times are different).


You can hear Cornelia speak while she gives the class

This is an audio class - you can hear the teacher  but any questions (if you have any) need to be typed in the normal BBO way (more on this later).

How to - find the class

Register and get a Login ID for BBO.  OK - if you really don't want to do this you can follow the instructions in my Acol Club on BBO post except that you need to go -

       List all tables
       All Public and Private Clubs
       All Public Clubs

then on the line with  -   BILies Retreat  -  click  - Show Tables

Now set BBO to show Full Tables 1. If the time is about 5 minutes before the class then Cornelia's teaching table will be visible with Chick sitting in all four seats. Chick is Cornelia's BBO ID.

Once you have a BBO login ID the best way is to 'Friend' Chick.  You can do this at anytime even when she is not logged on. So do this well before your first ever class.

Login to BBO - your screen should be something like -

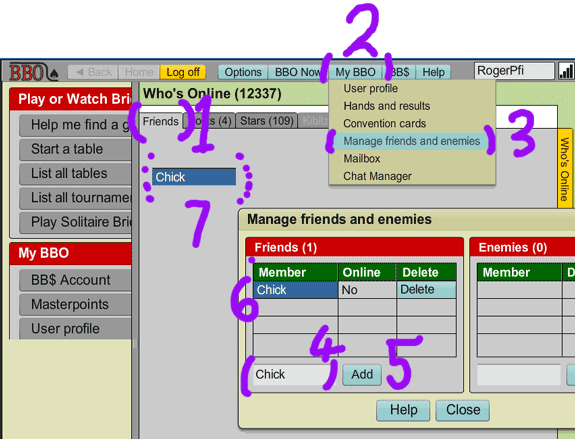
1. Click on the - Friends tab - so it is visible
2. Click on the - My BBO - (menu button)
3. Click on - Manage friends and enemies
4. Enter  Chick  in the input box.
5. Click - Add
6. She will then appear in your permanent friends list
7. LATER - when she is on line, Chick will appear under Friends 1.

When you see that Chick is online -

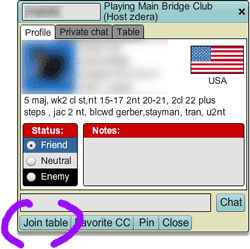
Click on her name 7. (above) and something like the adjacent box will appear.

Click on the Join table button (bottom left) and you will be taken to her table.

During the class you will told to view only the East or the West hands.  To do this click on the NAME BAR of the seat in question and with the mouse menu select  - Kibitz <seat name>

I suggest BEFORE your first class you go to a table (anywhere) and practice the above.

If you are not used to the BBO table settings, I recommend -

(Mouse menu button)  click on the cards / card area and select

      Display deal using pictures of cards

then (Mouse menu button)  click on a card and select

      Use bigger cards


You can hear Cornelia speak while she gives the class

This is an audio class. At the start of the class Cornelia will put up a link on BBO chat area of her room and all you have to do is to click it.  The link is -


Note - this link only works while the class is in progress.  When working the link shows a web page which you need to keep open to keep hearing her voice.  (BBO has its own voice system which Cornelia DOES NOT USE, so you can ignore any 'voice options' you see on the BBO table page.)

I know that this way of sending out sound works for Windows, Macs and Linux. I don't know what listen2myradio.com system is like for iPads or other pad/portables.  If you know the answer (or find out the answer) why not leave a comment and tell us all.


Don't worry if all this appears a bit daunting, it will all be obvious come the second week.

Friday, 27 September 2013

Acol Club on BBO - How to find it

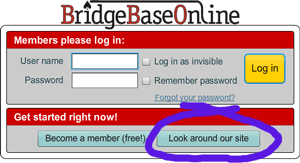
We all know BBO is a top online Bridge site.  So you go there and log in or use the 'Look around our site' button.


Click   -   List all tables


Click   - 

All public and Private Clubs


Click  - 

The Acol Bridge Club  (public)
Once there you can click on  Full Tables numbered 1 and on Kibitzers numbered 2. Then click Join on a table with a few kibitzers to watch the play.

Having Lots of Kibbers can mean the play is more interesting.

Have a look under Option (top center) - More Options, for - you guessed it - interesting options.
 

Friday, 6 September 2013

Standard American 21 - Book Review

First published in 2004, with the second edition in 2006 this book is aimed clearly at ageing American bridge players who see themselves as descendants of the Goren way of bridge.  It also titles itself as a book for rubber bridge players but in truth only one chapter out of the 14 was given over to rubber bridge and that was well worth the read.

I bought the book because, coming from the Acol world, I wanted insight into five card majors.  This book precisely hit the spot.  It's a great summary of the background cloud of bridge assumptions that American bridge players have all grown up with.  With larger than average print the book documents these assumptions precisely and clearly.  This bidding culture has also updated for the 21st century, insisting that weak twos, Stayman and transfers are all basic, must have's, even for rubber bridge players.

Recommended - except if you're a good player who already knows Standard American, because in that case you don't need it.

Saturday, 31 August 2013

One Click to Open Web Lin Files

The previous series of posts covered using aaBridge to help practice counting the hand. The core of the system is that you find a list of lin files on BBO and view them using aaBridge.

For Windows users, Opera can make this last stage a one click operation.

Install both aaBridge and the Opera Browser on your windows pc.

In Opera -


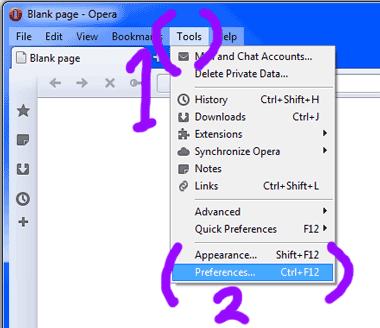
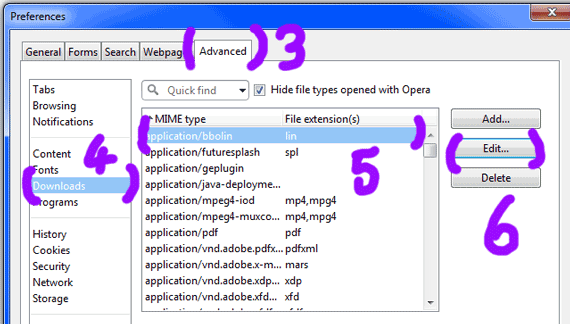
1. Click     Tools

2. Click   Preferences...
3.  Click the Advanced  tab
4.  Click Downloads
5.  Click the MIME entry       application/bbolin        lin
6.  Click the  Edit...

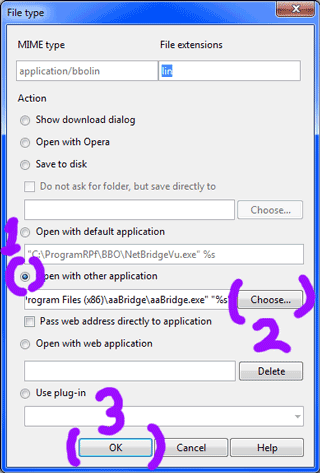
Look to see if any of the applications listed are aaBridge.  Here it is the second application so you need to select it.

1.  Select open with aaBridge as the default action.

If aaBridge is missing ! you can press 2. Choose and add it.

3. Click OK
From now on, when you click on a  lin file showing on a web page in Opera


It will launch aaBridge and show the hand.
 

Thursday, 29 August 2013

Counting the Hand 7

Length signals practice with aaBridge


While no genius as a bridge player, aaBridge does have autoplay capability.  This is most commonly used to play the defense when the majority of the high cards have been dealt to the North South hands with a real person sitting South.

If instead it you sit either East or West then aaBridge will still deal all the high cards to the North South pair and play them as declarer and dummy.  You can then practice counting the hand while your partner gives you count signals.

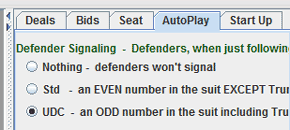
Look under the Seat and AutoPlay tabs for the appropriate settings.  aaBridge only signals with cards eight and below. It will pay no attention to your signals but that does not mean you need not bother to practice them.   :)

This is the final post in the series on counting.  Thank you for reading.

Tuesday, 27 August 2013

Counting the Hand 6

Example 6a - Sitting South Playing in Six Spades


This is post number 6 in the series on counting.  For information on where to download the free multi-platform aaBridge program and how to set it up for training, see the earlier posts in this series.

Remember to click the AutoPlay tab and then look to see that Show Hidden Hands is unchecked. You should also open the Seat configuration tab and (as this is a preset example hand) set it to - "Use the 'You Seat' set in the deal".  This makes sure you will not accidentally see the hidden hands.

If you forget and aaBridge does open up with the wrong hand showing, then you can use the same trick that is always needed for the BBO hand viewer. Squint so you can't see any of the detail and click with your mouse on the compass name bar of the hand you want to become visible.

Run your copy of aaBridge and drag-and-drop 'Example 6a' from the lin file collection into your running app. 

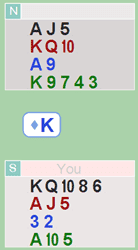
Declarer has bid an unfortunate small slam especially given the lead of the king of diamonds.  The matching shape in hearts and diamonds removes almost all flexibility.  We have five spades, three hearts, a diamond and two clubs.  And that makes 11 tricks.  With a certain loser in diamonds we have to bring the clubs in for three tricks without loss.

Excluding crazy play by the opposition the only way declarer can make the contract is to find either a doubleton queen and jack of clubs or the club suit splitting 4 – 1 with the singleton being either the queen or jack.  And in that case we will need to be in a position to finesse the remaining honor.

The only reasonable line of play is to run tricks and see what the defenders throw away.  Follow in your own running aaBridge application.

On tricks two and three declarer draws trumps, West shows out on the second round and discards the four of diamonds, so East started with four spades and West with one.  As West started with the king of diamonds presumably from king queen and has just thrown one away, let's assume he has the largest proportion of the nine diamonds they share. Of course they may be split 6 - 3 and not  5 - 4. Ideally we want to fill in the blanks so we can discover the club distribution.

W     1 = ? = 5 = ?            E     4 = ? = 4 = ?

Follow along as declarer cashes winners in trumps and hearts.  On trick eight West, who earlier threw a heart when he could not follow to the spades, shows out of hearts and throws a club.  So we now know West started with three hearts.

W     1 = 3 = 5 = 4            E     4 = 4 = 4 = 1

So if we are correct about the 5 - 4 division of the diamonds we now know the clubs started as 4 to West and 1 to East.  And declarer might just have a chance but of course if West started six diamonds then he will also have started with only three clubs.

Time to find out more about the distribution, so declarer leads his losing diamond picked up by East's jack.  Who spits back another diamond, ruffed by declarer with the last trump.  Declarer now has K 9 7  facing A 10 5  in clubs and nothing else.  We know East has the remaining heart.  Declarer cashes the ace of clubs and the jack appears from the East, a chance!   But still no certainty.  The five of clubs is led towards the king and nine, West playing the eight.  And declarer ... ?

I don't need to tell you what declarer did because you are following along in your own copy of aaBridge and so you know.  Of course if you're not following along just go back a couple of posts and see how to install aaBridge on your Windows, Mac or Linux machine.

Sunday, 25 August 2013

Counting the Hand 5

Practicing counting with aaBridge


First a quick recap, you have installed and configured aaBridge, you have been to the BBO hands site and have a tabled list showing some hands played by experts.
By clicking on one of the Lin links you can (after a couple of clicks or so) view and step through the play of the hands in aaBridge. If this is not the case then you need to go back a post or two and read up on the procedure.

Suggestion: - When you first start using this procedure and are trying to practice counting as a defender, select game to high level contracts that have gone one down. When you are trying to practice counting as the declarer, select game to high level contracts that have only just made.

Because the hands on the BBO site age out after a few months I cannot direct you to a fixed example that you can download from them.  Instead here is a link to a zip file containing some examples that can be worked through here in this blog post. Download the zip file, and unzip it and load the first example into aaBridge.

5a - Sitting East against Six Hearts by South


Follow along in your own copy of aaBridge.

If you are someone who likes to see the actual bids physically happen then you can click the button marked Bidding on the left-hand side of the green command bar.  Then click on Show Bidding and the bidding will play through to the end, you can vary the speed, (click on Options in the menu bar).  Click, Review the Play to continue from where we were.

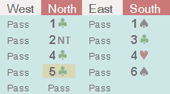
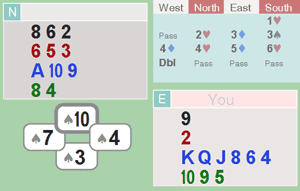
What does the bidding tell us?  Despite our attempts to butt in with three diamonds and again with five diamonds, South forged on, all the way to six hearts. The three spade bid almost looks like a reverse, despite being forced there by our bid of three diamonds.

Surely South has to have at least six hearts and maybe as many as five spades, but four is probably more likely.  If this is so then South has at least 10 cards in the majors leaving only three cards maximum for the minors. South being long in both majors certainly fits with our hand shape.

What about the points?  We have a meager six, North for his two heart response can't have that many.  Partner?  Must have something serious for the double. She certainly can't be expecting, or shouldn't be expecting, any trick from diamonds. Either way south must have a powerhouse of…?

If you want to see only the first card of the first trick then click the Play Single Card button as shown in the adjacent image. This is normally done when counting as declarer but there's no reason why you can't do it when defending.

The first trick
Straight away we can see that partner must have the queen of clubs to go with her king.  And that's five points taken care of.  But let's back up a bit - we have just seen the dummy and if our analysis is correct about the distribution of South's hand, we can try to work out what shape partner must have.

Assuming South has six hearts then North must have three and we have one, so partner must have the remaining three.  What about the diamonds?  Partner supported us at the four level so she must have at least three of the four that remain. This leaves only one for South which in turn would leave South with only two clubs.

If doing this sort of thing is new to you then take a pencil and paper and start to write down your own notes.  It's slow and tedious at first but it's the only way to improve.  I am writing notes on the hands as I count them so you can too.

If we take South to be  4 = 6 = 1 = 2  then partner must be 3 = 3 = 3 = 4

The second trick
Wow, this trick tells so much.  It's now almost certain the declarer must have started with the five spades A K Q J 3.  Partner surely would not have held up the ace if she had it as we know that she has the queen of clubs which she would now want to cash.

Declarer has clearly under led his four top honors in order to get an entry to the table and has done this before attempting to draw trumps.  And if declarer has five spades than he has to have one less of something else. Let's assume partner has the four diamonds which goes well with her four level bid in the suit.  This means that declarer may be 5 = 6 = 0 = 2 and partner 2 = 3 = 4 = 4.  Of course South minor suits could actually have been 1 = 1 in which case he is now out of clubs and has one diamond which would go on the ace.  I wonder what declarer will lead from dummy?

So now we know declarer did start with a void in diamonds and his second club, a clear loser, has just vanished.  Is there a realistic chance that he has only five hearts and an extra spade or club?  The extra spade is out of the question because with a six card spade suit that strong, it would have been the suit to open.  As for the extra club; his bidding would certainly have been a bit reckless if he had started with  A x x  in clubs. It's looking more and more likely that our call of declarer
being 5 = 6 = 0 = 2 and partner 2 = 3 = 4 = 4 is on the money.

The fourth trick
Declarer plays the three of hearts from table and the ace from his hand, partner following with the ten.

The fifth trick
I am only showing the first two cards because the jack says it all.  Partner must also have the king because otherwise declarer would play it.  Declarer is playing the nine with the hope that the king and jack will crash on each other.  It's not his lucky day.  So six hearts is going one down.

Click the Normal button to leave Review mode and have aaBridge show you the way it likes to display a finished hand.
Yes, this was an actual deal found using the method I described earlier.  The only changes I have made were to remove the names.  It did not seem reasonable to leave the names on view.  I also rotated the cards so that the actual declarer was in the actual South seat.  This is simple to do with the aaBridge editor with just a couple of clicks.