Practicing counting with aaBridge
First a quick recap, you have installed and configured aaBridge, you have been to the BBO hands site and have a tabled list showing some hands played by experts.

Suggestion: - When you first start using this procedure and are trying to practice counting as a defender, select game to high level contracts that have gone one down. When you are trying to practice counting as the declarer, select game to high level contracts that have only just made.
Because the hands on the BBO site age out after a few months
I cannot direct you to a fixed example that you can download from them. Instead here is a link to a zip file containing some examples that can be worked through here in this blog post. Download the zip file, and unzip it and load the first example into aaBridge.
 Follow along in your own copy of aaBridge.
5a - Sitting East against Six Hearts by South
Follow along in your own copy of aaBridge.
If you are someone who likes to see the actual bids physically
happen then you can click the button marked Bidding on the left-hand side of the green command bar. Then click on Show Bidding
and the bidding will play through to the end, you can vary the speed, (click on Options in the menu bar). Click, Review the Play to continue from where we were.
What does the bidding tell us? Despite our attempts to butt in with three diamonds and again with five diamonds, South forged on, all the way to six hearts. The
three spade bid almost looks like a reverse, despite being forced there by our bid of three diamonds.
Surely South has to have at least six hearts and maybe as many as five spades, but four is probably more likely. If this is so then South has at least 10 cards in the majors leaving only three cards maximum for the minors. South being long in both majors certainly fits with our hand shape.
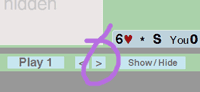 If you want to see only the first card of the first trick
then click the Play Single Card button as shown in the adjacent image. This is normally done when counting as declarer but there's no reason why you can't do it when defending.
If you want to see only the first card of the first trick
then click the Play Single Card button as shown in the adjacent image. This is normally done when counting as declarer but there's no reason why you can't do it when defending.
The first trick

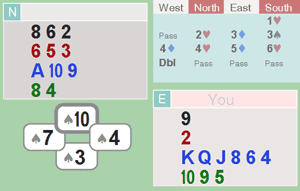 Wow, this trick tells so much. It's now almost certain the declarer must
have started with the five spades A K Q J 3. Partner surely would not have held up the ace
if she had it as we know that she has the queen of clubs which she would now want to
cash.
Wow, this trick tells so much. It's now almost certain the declarer must
have started with the five spades A K Q J 3. Partner surely would not have held up the ace
if she had it as we know that she has the queen of clubs which she would now want to
cash.
 So now we know declarer did start with a void in diamonds
and his second club, a clear loser, has just vanished. Is there a realistic chance that he has only
five hearts and an extra spade or club?
The extra spade is out of the question because with a six card spade suit that strong, it
would have been the suit to open. As for the extra club; his
bidding would certainly have been a bit reckless if he had started with A x x in clubs. It's looking more and more likely that our call of declarer
So now we know declarer did start with a void in diamonds
and his second club, a clear loser, has just vanished. Is there a realistic chance that he has only
five hearts and an extra spade or club?
The extra spade is out of the question because with a six card spade suit that strong, it
would have been the suit to open. As for the extra club; his
bidding would certainly have been a bit reckless if he had started with A x x in clubs. It's looking more and more likely that our call of declarer
being 5 = 6 = 0 = 2 and partner 2 = 3 = 4 = 4 is on the money.

Surely South has to have at least six hearts and maybe as many as five spades, but four is probably more likely. If this is so then South has at least 10 cards in the majors leaving only three cards maximum for the minors. South being long in both majors certainly fits with our hand shape.
What about the points?
We have a meager six, North for his two heart response can't have that
many. Partner? Must have something serious for the double. She certainly can't be expecting, or shouldn't
be expecting, any trick from diamonds.
Either way south must have a powerhouse of…?
If you want to see only the first card of the first trick
then click the Play Single Card button as shown in the adjacent image. This is normally done when counting as declarer but there's no reason why you can't do it when defending.The first trick
Straight away we can see that partner must have the queen of
clubs to go with her king. And that's
five points taken care of. But let's
back up a bit - we have just seen the dummy and if our analysis is correct about the
distribution of South's hand, we can try
to work out what shape partner must have.
Assuming South has six hearts then North must have three and we have one, so partner must have the remaining three. What about the diamonds? Partner supported us at the four level so she must have at least three of the four that remain. This leaves only one for South which in turn would leave South with only two clubs.
Assuming South has six hearts then North must have three and we have one, so partner must have the remaining three. What about the diamonds? Partner supported us at the four level so she must have at least three of the four that remain. This leaves only one for South which in turn would leave South with only two clubs.
If doing this sort of thing is new to you then take a pencil
and paper and start to write down your own notes. It's slow and tedious at first but it's the
only way to improve. I am writing notes
on the hands as I count them so you can too.
If we take South to be 4 = 6 = 1 = 2 then partner must be 3 = 3 = 3 = 4
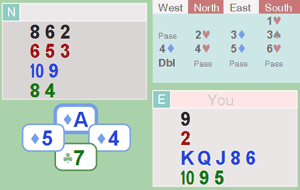
The second trick
Wow, this trick tells so much. It's now almost certain the declarer must
have started with the five spades A K Q J 3. Partner surely would not have held up the ace
if she had it as we know that she has the queen of clubs which she would now want to
cash.
Declarer has clearly under led his four top honors in order
to get an entry to the table and has done this before attempting to draw trumps. And if declarer has five spades than he has
to have one less of something else. Let's assume partner has the four diamonds
which goes well with her four level bid in the suit. This means that declarer may be 5 = 6 = 0 = 2 and partner 2 = 3 = 4 = 4. Of course South minor suits could actually
have been 1 = 1 in which case he is now out of clubs and has one diamond which
would go on the ace. I wonder what declarer will lead from dummy?
So now we know declarer did start with a void in diamonds
and his second club, a clear loser, has just vanished. Is there a realistic chance that he has only
five hearts and an extra spade or club?
The extra spade is out of the question because with a six card spade suit that strong, it
would have been the suit to open. As for the extra club; his
bidding would certainly have been a bit reckless if he had started with A x x in clubs. It's looking more and more likely that our call of declarerbeing 5 = 6 = 0 = 2 and partner 2 = 3 = 4 = 4 is on the money.
The fourth trick
Declarer plays the three of hearts from table and the ace from
his hand, partner following with the ten.
The fifth trick
I am only showing the first two cards because the jack says
it all. Partner must also have the king
because otherwise declarer would play it.
Declarer is playing the nine with the hope that the king and jack will crash
on each other. It's not his lucky day. So six hearts is going one down.

Click the Normal
button to leave Review mode and have aaBridge show you the way it likes to
display a finished hand.
Yes, this was an actual deal found using the method I described
earlier. The only changes I have made
were to remove the names. It did not
seem reasonable to leave the names on view.
I also rotated the cards so that the actual declarer was in the actual South seat. This is simple to do with the aaBridge editor with just a couple of clicks.
No comments:
Post a Comment