Example 6a - Sitting South Playing in Six Spades

This is post number 6 in the series on counting. For information on where to download the free multi-platform aaBridge program and how to
set it up for training, see the earlier posts in this series.

Remember to click the AutoPlay tab and then look to see that Show Hidden Hands is unchecked. You should also open the Seat configuration tab and (as this is
a preset example hand) set it to - "Use the 'You Seat' set in the deal". This makes sure you will not accidentally see
the hidden hands.
If you forget and aaBridge does open up with the wrong hand
showing, then you can use the same trick that is always needed for the BBO hand viewer. Squint so you can't see any of
the detail and click with your mouse on the compass name bar of the hand you
want to become visible.
Run your copy of aaBridge and drag-and-drop 'Example 6a' from the lin file collection into your running app.
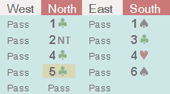
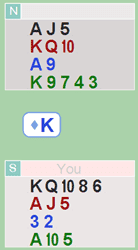 Declarer has bid an unfortunate small slam especially given the lead of the king of diamonds.
The matching shape in hearts and diamonds removes almost all flexibility. We have five spades, three hearts, a diamond
and two clubs. And that makes 11 tricks. With a certain loser in diamonds we have to
bring the clubs in for three tricks without loss.
Declarer has bid an unfortunate small slam especially given the lead of the king of diamonds.
The matching shape in hearts and diamonds removes almost all flexibility. We have five spades, three hearts, a diamond
and two clubs. And that makes 11 tricks. With a certain loser in diamonds we have to
bring the clubs in for three tricks without loss.
Excluding crazy play by the opposition the only way declarer can make the contract is to find either a doubleton queen and jack of clubs or the club suit splitting 4 – 1 with the singleton being either the queen or jack. And in that case we will need to be in a position to
finesse the remaining honor.
The only reasonable line of play is to run tricks and see
what the defenders throw away. Follow in
your own running aaBridge application.
On tricks two and three declarer draws trumps, West shows out on the second round and discards the four of diamonds, so East started with
four spades and West with one. As West
started with the king of diamonds presumably from king queen and has just
thrown one away, let's assume he has the largest proportion of the nine
diamonds they share. Of course they may be split 6 - 3 and not 5 - 4. Ideally we want to fill in the blanks so we can discover the club distribution.
W 1 = ? = 5 = ? E 4 = ? = 4 = ?

Follow along as declarer cashes winners in trumps and hearts. On trick eight West, who earlier threw a
heart when he could not follow to the spades, shows out of hearts and throws a
club. So we now know West started with
three hearts.
W 1 = 3 = 5 = 4
E
4 = 4 = 4 = 1
So if we are correct about the 5 - 4 division of the diamonds we
now know the clubs started as 4 to West and 1 to East. And declarer might just have a chance but of course
if West started six diamonds then he will also have started with only three clubs.
Time to find out more about the distribution, so declarer
leads his losing diamond picked up by East's jack. Who spits back another diamond, ruffed by
declarer with the last trump. Declarer
now has K 9 7 facing A 10 5 in clubs and nothing else. We know East has the remaining heart. Declarer cashes the ace of clubs and the jack
appears from the East, a chance! But still no
certainty. The five of clubs is led
towards the king and nine, West playing the eight.
And declarer ... ?
I don't need to tell you what declarer did because you are following
along in your own copy of aaBridge and so you know. Of course if you're not
following along just go back a couple of posts and see how to install
aaBridge on your Windows, Mac or Linux machine.
No comments:
Post a Comment